
In the First part of this blog series we got to know the GPIOs as an outcome for LEDs, buzzer and relays. In the second part It was about programming the GPIOs as the entrance for buttons and sensors. Now we are devoting ourselves to the special sensors that are connected to defined electronic interfaces. The sensor kit includes the temperature sensors DHT11
and DS18B20. On the occasion we will treat the DHT22 with you. And finally we look at the component that looks and, if necessary, also used like a potentiometer, but none is: the Rotary Encoder or not very correct in German the rotary switch, rotary code or rotary angle coder.
Required parts (as in part 1)
|
1 |
|
|
1 |
|
|
old |
|
|
1 |
|
|
Jumper cable, Button/button |
|
|
optional |
Temperature sensor DS18B20
Let's start with the temperature sensor DS18B20, which is available in different designs. The original form is similar to a small transistor in a black housing with three legs. In the sensor kit, the component is soldered together with an LED and the resistance on a small board. My favorite is the waterproof sensors used in a stainless steel housing with an approx. 1 m long cable.
 |
 |
 |
All are immediately connected and integrated into the program. However, you need two Micropython modules that are downloaded under the menu item Tools/Managed Packages ... OneWire and DS18B20.

 The name of the penetration bus (OneWire) confuses something because the component finally has three connections, but two serve the power supply with 3.3V and GND. The (mostly) yellow cable is used for data transmission and is connected to any GPIO pin. The signal is neither digital (high or low) nor analogously (voltage between 0 and 3.3V), but it is a transmission protocol with many bits and bytes, which can be used with the Logic Analyzer and can look at the associated program. The evaluation takes place with the help of the modules, so that the program example is very short.
From machine import Pin code
From OneWire import OneWire
From DS18x20 import DS18x20
import utime AS time
one_wire_bus = Pin code(13) # any pin, pull_up in the module OneWire
sensor_ds = DS18x20(OneWire(one_wire_bus))
devices = sensor_ds.scan()
while True:
sensor_ds.convert_temp()
time.sleep(1)
# Query sensors
for device in devices:
print('Sensor:', device)
print('Temperature:', sensor_ds.read_temp(device), '° C')
print()
time.sleep(5)

Two comments: First, it is often described that the signal pin should be connected to VCC via a pull-up resistance of 4.7 KOHM. This can be omitted because the internal pull-up resistance for the selected PIN is activated in the module. Second, you can switch several DS18B20 in parallel and assign the temperature value to the respective sensor via a clear identifier. See the program example, in which a total of three sensors are connected.
Temperature sensor DHT11
The combined temperature and humidity sensor DHT11 also only has three pins. Here, too, the signal pin is to be connected to VCC via a pull-up resistor of 10 kohm. However, this is already soldered on the small circuit board and therefore dispensable here. In addition, the internal pull-up resistance can be activated when instantiation of the sensor:
From dht import DHT11
DHT11_Sensor = DHT11(Pin code(13, Pin code.IN, Pin code.Pull_up))

 Upper picture: DHT11 on mini board; The number 34 refers to the section in the eBook sensor kit with Arduino.
Lower picture: Installation of the package (module) dht For DHT11 and DHT22
From machine import Pin code
import utime AS time
From dht import DHT11
DHT11_Sensor = DHT11(Pin code(13, Pin code.IN, Pin code.Pulp_up)) #data pin = gp13
time.sleep(1)
while True:
DHT11_Sensor.measure()
T = DHT11_Sensor.temperature()
rhinoceros = DHT11_Sensor.humidity()
print("Temperature:", T, "° C")
print("Rel. Air humidity:", rhinoceros, "%")
print()
time.sleep(5) #Sleep for five seconds

Temperature sensor DHT22 (not included)
The sensor is not in the sensor kit, but to be integrated with the same Python module DHT22. Externally very similar to the DHT11, but with white housing and four pins, one of which is not occupied.
 |
 |
How to do in the program library (module dht.py), the DHT22 is more precise in the resolution. Temperature and rel. Air humidity is stored in two registers instead of in a register as with the DHT11. This leads to measurement results with a comma place.

Picture: Excerpt from the module DHT.PY, calculation of the rel. Air humidity and temperature
Here is a sample program for the DHT22:
From machine import Pin code
import utime AS time
From dht import DHT22
dht22_Sensor = DHT22(Pin code(13, Pin code.IN, Pin code.Pulp_up)) #data pin = gp13
time.sleep(1)
while True:
DHT11_Sensor.measure()
T = dht22_Sensor.temperature()
rhinoceros = dh221_Sensor.humidity()
print("Temperature:", T, "° C")
print("Rel. Air humidity:", rhinoceros, "%")
print()
time.sleep(5) #Sleep for five seconds

Also similar to the two DHT 11 and 22, but with a black housing, is the DHT 20. This works with an I2C interface and needs another library that you do not find in the package management under Thonny, but on Github: https://github.com/flrrth/pico-dht20.
We tested the DHT 20 in detail when you are included in the range and described it in a blog (with Arduino IDE and Logic Analyzer):
DHT20 - a new temperature and humidity sensor
In another blog, the DHT 20 is used at the Raspberry Pi Pico W with Micro Python:
Raspberry Pi Pico W with BME280 and OLED in Thonny and Micropython
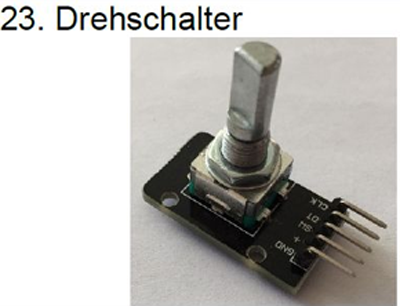
Rotary Encoder (filmer, rotary switch)
The last, not yet considered component from the sensor kit, is the Rotary Encoder
 |
 |

The filmmaker are mechanical devices that look a little like potentiometer and are often used in their place. However, they do not provide analog values that can be assigned to a certain position and have no end attacks. Most of them can be recognized by the fact that they apparently snap in after a small rotation, but you can easily continue to turn. In my Rotary Encoder 20 "Clicks" I counted in a revolution, i.e. 360 °/20 = 18 ° from snap position to snap position.
This happens within this 18 ° rotation, which leads to the desired effect. In each of the 20 snapage positions, the voltage VCC = 3.3V on the contacts DT and CLK lies over the pull-up resistors of 10 kohm. In between, these contacts are connected differently to mass, first one, then both, then only the other. This sequence not only recognizes the rotation itself, but also the direction of rotation. How good that there are microcontrollers and suitable program libraries for Arduino-Ido and Micropython for the detection and evaluation.
For the sake of completeness: If you do not turn the Rotary Encoder, but press it in, the contact SW is switched against ground, i.e. a simple button (button), as in second part described.
Here is the link to the program library on Github and a sample program:
https://github.com/miketeachman/micropython-rotary
# With license (with)
# Copyright (c) 2021 Mike Teachman
# https://opensource.org/licenses/mit
# Example for Micropython Rotary Encoder
From rotary_irq_rp2 import Rotaryirq
import time
r = Rotaryirq(Pin_num_clk=13,
pin_num_dt=14,
min_val=0,
Max_val=19,
reverse=True,
range_mode=Rotaryirq.Range_wrap)
Val_old = r.value()
while True:
VAL_NEW = r.value()
IF Val_old != VAL_NEW:
Val_old = VAL_NEW
print('result =', VAL_NEW)
time.Sleep_ms(50)

We used all parts of the 35 in 1 sensor kit with the Raspberry Pi Pico under Micropython. ARDUINO IDE users can find explanations and program examples in the (M.E.) very good eBook, which can be downloaded on the product page.
In conjunction with the previous blog posts for the Raspberry Pi Pico, you can display your measurement results on a small LCD or OLED display or provide WiFi at home. Have fun with your projects, I “plunge” next to the SD card reader to record my measurement results.
Here again our previous contributions on Pico/Pico W:
- Raspberry Pi Pico and Thonny with Micropython - Part 1
- Raspberry Pi Pico and Thonny with Micropython - Part 2
- Raspberry Pi Pico and Thonny with Micropython - Part 3
- Raspberry Pi Pico W with BME280 and OLED in Thonny and Micropython
- Weather station with Raspberry Pi Pico and Oled Display
- Night light with Raspberry Pi Pico and WS2812B RGB LED
- Raspberry Pi Pico as an analog clock
- Raspberry Pi Pico - Quick Start
- Control Raspberry Pi Pico W - Smart Robot Car with your smartphone
- Raspberry Pi Pico W now with Bluetooth - Part 1
- Raspberry Pi Pico W now with Bluetooth - Part 2 - Robot Car and Controller
- Raspberry Pi Pico W now with Bluetooth - Part 3 - Robot Car with a smartphone app
- Raspberry Pi Pico W now with Bluetooth - Part 4 - Robot Car with flashing lights and siren (pio -controlled)


