
This post is also available as PDF file for download.
Our door gong with a SAB600 chip has been doing its job for many, many years. The part has been annoying since we moved, because in between it just thinks they have to give loudly, even if nobody pressed the bell button. Probably they are tension peaks or HF impulses from the house, or from the neighborhood that trigger the very sporadically blind alarm. This is particularly bad in the middle of the night, so you stand vertically in bed. Nothing helped to defuse the input of the module. So I had been looking for an alternative solution with a less sensitive entrance for a long time.

Figure 1: Türgong in development
When I recently got a mini-MP3 player module of approx. 2x2 cm edge length in my fingers, I already had it, the solution. The SAB600 may retire and an ESP8266 together with the DF player Mini will take over the position at the front door. And because I am currently working on the MQTT blog contributions, it was obvious to integrate this mini project into this system. Be excited and welcome to the series "Server and Clients under Micropython on the Raspi and the ESP family" today with the topic
6. The slightly different door gong
You probably already have guessed it. This door guard not only can simply Ding-Dang, of course he can do that too, but then he can also do dog bark, cock cry, crying baby, the bells of big Ben, his own announcements, the sound of Ennio Morricone and much more. The imagination knows no limits. Ok, what do we need?
Hardware:
|
1 |
Raspberry Pi Bundle with PI 1 B+, PI Pico and Accessories or |
|
1 |
Raspberry Pi (1b+, 2, 2b, 3, 3b) ff. |
|
1 |
SD card 8-16GB to match the selected Raspi |
|
1 |
Breakboard |
|
various |
Jumper cable |
|
1 |
Raspi power supply, 5V, 2.5A |
|
1 |
Monitor (only to set up the Raspi) |
|
1 |
Keyboard (only to set up the Raspi) |
|
1 |
Mouse (only to set up the Raspi) |
|
1 |
HDMI cable (only to set up the Raspi) |
|
1 |
Network cable |
|
1 * |
|
|
1 * |
|
|
1 * |
Resistance 680Ω (for red LED) |
|
1 * |
Resistance 1.5kΩ (for blue LED) |
|
1 * |
Resistance 2.7kΩ (for green LED) |
|
1 * |
Voltage supply 5V, 500mA for the ESP8266 |
|
1 * |
|
|
1 * |
|
|
1 |
Small loudspeaker with approx. 3 - 5W |
The parts in the list with a "*" "" relate to the current project. The other parts were already in use in the previous consequences. The Raspberry Pi and the associated parts relate to the integration of the door gong into the MQTT overall project. By integrating the MQTT network, the bell replacement becomes smart! In the second part of this description, we expand the existing broker configuration. This encloses, saved and (remote).
So that I don't have to tell everything again, you will find a brief compilation of what has been done in the MQTT project so far.
- In episode 1 - MQTT - Raspberry Pi - Mosquitto and Node -Red we installed Node-Red and the MQTT server Mosquitto on the Raspberry Pi.
- In episode 2 An ESP8266 as a MQTT client and
- Episode 3 Expansion of the MQTT-Home system Created a second MQTT client with the ESP8266 and an MQTT monitor with an ESP32 for control and monitoring the system.
- To the clear Representation of the data recorded by the tool Node-Red Was it in episode 4. There the handling of the web interface of Node-Red was dealt with.
- In the 5th episode We had dealt with the protection of data traffic, provided that we allow us to have the limited possibilities of the ESP8266.
software
In the following, all software parts that are used for the MQTT project and the door gong are listed.
Software for ESP32/8266:
Thonny or
Firmware:
Micropython to match the ESP32 or ESP8266
Micropython modules and program files:
doorbell.py With MQTT use
Node-red flow cellar+heating.json From episode 5
doorbell_wo_mqtt.py, if you want to use the door gong without MQTT.
Software for the Raspi:
Imager.exe Burning program for the SD-Card
Mosquitto broker
Node-Red
Software for the Windows machine
Micropython - Language - Modules and Programs
To install Thonny you will find one here Detailed instructions. There is also a description of how that Micropython firmware (As of December 15, 2021) On the ESP chip burned becomes.
Micropython is an interpreter language. The main difference to the Arduino IDE, where you always flash entire programs, is that you only have to flash the Micropython firmware once on the ESP32 before the controller understands micropython instructions. You can use Thonny, µpycraft or ESPTOOL.PY. For Thonny I have the process here described.
As soon as the firmware has flashed, you can easily talk to your controller in a dialogue, test individual commands and see the answer immediately without having to compile and transmit an entire program beforehand. That is exactly what bothers me on the Arduino IDE. You simply save an enormous time if you can check simple tests of the syntax and hardware to trying out and refining functions and entire program parts via the command line before knitting a program from it. For this purpose, I always like to create small test programs. As a kind of macro, they summarize recurring commands. Whole applications then develop from such program fragments.
Autostart
If the program is to start autonomously by switching on the controller, copy the program text into a newly created blank tile. Save this file under boot.py in WorkSpace and upload it to the ESP chip. The program starts automatically the next time the reset or switching on.
Test programs
Programs from the current editor window in the Thonny-IDE are started manually via the F5 button. This can be done faster than the mouse click on the start button, or via the menu run. Only the modules used in the program must be in the flash of the ESP32.
In between, Arduino id again?
Should you later use the controller together with the Arduino IDE, just flash the program in the usual way. However, the ESP32/ESP8266 then forgot that it has ever spoken Micropython. Conversely, any espressif chip that contains a compiled program from the Arduino IDE or AT-Firmware or Lua or ... can be easily provided with the micropython firmware. The process is always like here described.
The alternative door gong - the circuit
The circuit is very clear, it consists of just 4 modules and 3 resistors. If you only limit yourself to the signal unit, LED and resistance also fall away. This means that the LED is only used for status signals for radio transmission.

Figure 2: circuit door gong with DF player Mini
The button serves as a doorbell button during the development phase so that we do not have to whiz to the house entrance every test. The button can also be removed later.
DF players and ESP8266 D1 Mini are provided with the plug-in strips. This is best done with a cutboard, because later the distance and alignment are right. For the You will find a guide on my AVR side. There is also one there Instructions for the manufacture of circuit boards. I use a carrier board here because ESP8266 and DF players offer no fastening options except for the plug-in strips. But I come back to that later, we will build the circuit on a Breadboard. Two lines, signal and mass aka ground (GND) are sufficient for the button. We save the connection for the supply voltage, because we switch on the internal pullup resistor in the ESP8266, which draws the signal line to +3.3 V. However, it may be necessary to buffer the entrance later with an external pullup and a capacitor for mass if we find out when we connect a long sound line. If the line is completed too highly oh, it looks like an antenna and catches up with any disturbing high -frequency impulses, which can lead to problems with stability again.
The LED gives us information about the boot process through the three colors. She flashes blue when the ESP8266 is looking for a local WiFi with which it wants to connect. The Heartbeat is the green flashing. It tells us that the program runs properly. And the red LED tells us that there is an error.

Figure 3: button and LED
From the DF player Mini we need 6 connections, 5V, GND, twice speakers, RS232 input RX and BUSY. All entrances and outputs run together on the ESP8266 D1 Mini.
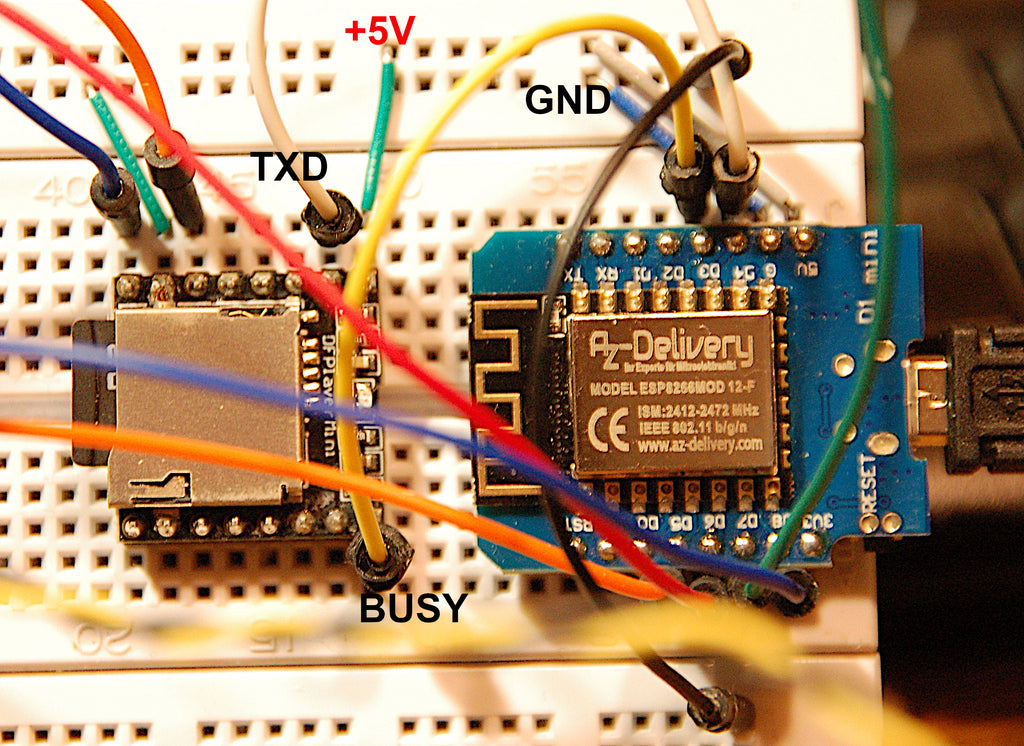
Figure 4: Player and ESP8266 D1 Mini
During the test phase, the entire structure is supplied from the PC via the USB cable. A separate 5V supply must be used in the production system. In the case of conventional doorbell rates, the bell transducer can also feed the circuit with energy together with a corresponding power supply (rectifier, sieve and 5V control). There is also bad news. In the case of signal systems with interrogation units that work via a bus system, such as the Bticino, our door gong is unfortunately not easy to use. After all, it would be conceivable using the bell button on the apartment door.
So that the ears also have something of our door gong, we of course have to donate a small speaker to the structure. I installed mine in a housing so that the basses also get over better. The performance of the speaker should be between 3 and 5 watts, its resistance between 4 and 8 ohms. For the tests, I use the speaker of a small Musicman cubes, the other defective inner-up.

Figure 5: Türgong in development
In the background is the 7 '' 'display of my Raspberry Pi on which the broker runs. However, I usually use it from the PC via SSH terminals. How this works, I have in Part 1 of this series described in detail. Now we come to the software.
The program for the Türgong
The program doorbell.py Cover the two pillars of the application, the operation of the DF player and the MQTT connection to the Mosquitto broker, which runs on the Raspberry Pi and is contacted by the ESP8266 via WLAN.
The server process is referred to as brokers under MQTT. Like HTTP, the MQTT protocol puts on the TCP/IP protocol, i.e. provides a secure connection with Handshake. Clients can send messages to the broker (publishers) and obtain (subscribers). A message includes a topic called topic and a payload, called Payoad. Our unit will subscribe to the Topics Haus/Doorbell/Folders, House/Doorbell/Title and House/Doorbell/Volume, i.e. subscribes and send under the topics Haus/Doorbell/Ringed and House/Doorbell/Title/New Messages. Topics have a similar tree structure as directories under Windows or Linux.
There is a mini SD card with 4 GB in the DF player, one with less memory scope is hardly available. The 32 sound files with different noises are housed in 4 folders of 8 files each. The files must have the names 000.mp3 to 999.mp3 by specification, the folders are referred to at 00 to 99. Normal filen names are not permitted. I partially collected the sounds from the Internet. With various databases you can download the sounds without fees, unless you use them for commercial purposes. Two links to this are in the Doorbell.py program. I recorded other files myself and with the free Tool Audacity processed. The playing time is between 2 to 8 seconds.
import OS,sys       # System and file instructions
From machine import Pin code, reset, I2C
From time import sleep, Ticks_MS
import network
From Umqttsimple import MQttclient
import ESP
ESP.Osdebug(None)
import GC
GC.collect()
From dfplayer import Dfplayer
The import business integrates a number of modules. Two of them are external. The files dfplayer.py and umqttsimple.py must be uploaded to the ESP8266 before the first program start. This happens with Thonny. The remaining modules are already included in the core of Micropython.
bland button=Pin code(14, Pin code.IN, Pin code.Pull_up)
status=Pin code(15,Pin code.OUT,value=0) # blue = 2
onair=Pin code(13,Pin code.OUT,value=0)  # gruen = 1
error=Pin code(12,Pin code.OUT,value=0)  # red = 0
LED=[error,onair,status ]
red,green,blue=0,1,2
Here the connections for the button and the LEDs are declared. The list LED allows access to the LEDs via numbers. The variables can also be used for indexing red, green and blue be used.
The connecting names on the Arduino on the ESP8266 D1 Mini must be translated into the names of espressif for Micropython. The table can serve for information.
# Pintranslator for ESP8266 boards
# Arduino-Pins D0 D1 D2 D3 D4 D5 D6 D7 D8
# ESP8266 Pins 16 5 4 0 2 14 12 13 15
# SC SD
DF=Dfplayer(Busypinnbr=0, volume=15)
topicbell= "House/Doorbell/Ringed"
Topic folder= "House/Doorbell/Folder"
topictitle= "House/Doorbell/Title"
Topicvolume= "House/Doorbell/Volume"
Topicnewtitle="House/Doorbell/Title/New"
Topicnewfolder="House/Doorbell/Folders/New"
folder=[
"Gong",
"Voices",
"Language",
"Music",
]
folder=0
numoftitles=8
title=0
vol=20
B=0
We create a DFPlayer object and create variables for the topics. The list Folder Present readable names for the sound folders. We start with folder 0, stipulate that there are 8 titles per folder (0… 7) and that we start with title 0. 20 is the value for the volume during the tests, in the productive system there should be 70 to 85. Choose the value as it best suits your volume feeling.
# ----------------------------------
def flashing(pulse,wait,col,inverted=False):
passport
IF inverted:
LED[col].off()
sleep(pulse)
LED[col].on()
sleep(wait)
Else:
LED[col].on()
sleep(pulse)
LED[col].off()
sleep(wait)
def Time-out(T):
begin=Ticks_MS()
def compare():
return intimately(Ticks_MS()-begin) >= T
return compare
We define a few functions. flashing() leaves an LED whose color in col is handed over as number 0… 2, for pulse Flash for seconds. Then the LED remains for wait Seconds. The program will then continue.
Time-out() creates and starts a software timer that does not block the program, unlike sleep(). The reference is returned to a function. This function gives the value in turn True Back if the time has expired, the duration of which is in milliseconds Time-out() was handed over.
Example:
>>> expired=Time-out(10000)
>>> expired()
output: False
>>> expired()
output: False
>>> expired()
Output: True
Delivers the value of 100,000 ms later True back, before False. Time-out() is a so -called Closure. There are also such structures in other programming languages, for example Node-MCU LUA. You can do more about this in this PDF document experience.
def hexmac(bytemac):
    """
 The HexMac function takes the MAC address in the bytecode
 opposite and forms a string for the rehabilitation
    """
    MacString =""
    for I in range(0,len(bytemac)):
        MacString += hex(bytemac[I])[2:]
        IF I <len(bytemac)-1 :
            MacString +="-"
    return MacString
hexmac() returns the MAC address of the WLAN interface StA. We will need them if our MQTT system is registered on the WLAN router. Without this information, the router will not let us go online.
def connect2broker():
    # Generate client instance
    client = MQttclient(myid, mymqttserver, user="Doorbell",\
                        password="5T6Z7U")
    client.set_callback(MessageAeart)
    client.connect()
    client.subscriber(Topic folder)
    client.subscriber(topictitle)
    client.subscriber(Topicvolume)
    print("Connected to:", mymqttserver)
    print("Subscribed to:",Topic folder,topictitle,Topicvolume)
    return client
We slowly come to the core of the application. connect2broker() does exactly what the name says. We create a MQttclient instance. The IP of our Raspberri Pi is the broker IP, our client has the name Doorbell And the password 5T6Z7U. The name and password are freely selectable, but must be announced to the broker. We'll do that later. Then we tell the client object what function it has to call when a message arrives. The callback function is called MessageAeart. In this way we encourage a reference to this function in the otherwise completed class MQttclient. In the class there is a variable self.cb that is assigned this reference. If self.cb () is called up as a method when receiving characters, then exactly what we in the function runs MessageAeart() have declared. With this trick we expand the functionality of the MQttclient class ourselves at will without having to intervene in the program code of the class.
The object client Connects to the broker and subscribe to the topics that are in the three variables Topic folder, topictitle and Topicvolume are stored. We are informed about the course and the client object is returned by the function.
def residual():
    print("Connection to {} failed - rebooting".\
          format(mymqttserver))
    sleep(10)
    reset()
If the connection to the broker is lost, an exception is thrown and as a result of residual() called. We receive a message in the terminal area from Thonny and after 10 seconds the system is restarted.
def MessageAeart(topic,MSG):
    global folder, title, vol
    topic=topic.decode()
    MSG=MSG.decode()
    IF topic == Topic folder:
        try:
            folder=intimately(MSG)
        except:
            folder=0
        print("Folder: {}. {}".format(MSG, folder[folder]))
        client.publish(Topicnewfolder, MSG+folder[folder])
    IF topic == topictitle:
        try:
            title = intimately(MSG)
        except:
            passport
        print("Title:",title)
        client.publish(Topicnewtitle, Str(title))
    IF topic == Topicvolume:
        try:
            vol = intimately(MSG)
        except:
            vol = 85
        print("Volume:",vol)
        DF.volume(vol)
The function MessageAeart() is executed when a message has arrived. folder, title and vol are global variables that are used outside of MessageAearrived (). Therefore, they are shown as global. The presented topic and the payload must be translated into a string from the bytes type, which makes the method decode(). Now we check which topic there is a message and initiate the respective action. We set the transmitted folding number and return the number and name that under the topic in Topicnewfolder is stored. Or we set the desired title. The number is also published. Finally, the volume can also be set to a new value. If there are any errors in the actions, the value is set in the Except branches.
def button pressed(pin code):
    global pressed
    bland button.IRQ(handler=None)
    pressed = True
The function button pressed() is called when the GPIO14 entrance changes from 1 (3.3V due to pull-up resistance) to 0. This is usually done by pressing the bell button. The triggering of the call passes through a so -called Interrupt (IRQ), an interruption of the main program. So that this does not happen again if the Key bruises (What every mechanical button does), the IRQ is first switched off and the flag pressed set on true. In the main loop, we ask the condition and at the same time test whether the button is still depressed. In this way, we can find that not only a short interference impulse was the trigger of the IRQ on the entrance line, but a real push of a button.
mymqttserver = "10.0.1.99"
myssid = 'Here_goes_your_ssid'
mypass = 'Here_goes_your_password'
# Absolutely turn off the AP interface
nac=network.WIRELESS INTERNET ACCESS(network.Ap_if)
nac.active(False)
nac=None
Here the IP address of the system on which the broker runs and the Credentials entered for network access. Please replace the placeholder with the data that your WLAN router specifies. The following three lines eliminate the error that the AccessSpoint interface causes in the ESP8266 and leads to constant restart of the controller. The AP interface (AccessSpoint) must be deactivated before the StA-Interface (station) starts. Another source of error in the ESP8266 is the web replacement function activated. To deactivate, the following must be done again every time.
Entry on the command line:
>>> import webrepl_setup
Web demon automobile-begin status: disabled
Padd You Like to (E)nible or (D)Isable IT running on boat?
(Ematy line to quit)
> D
NO viciner action required
The next 30 lines create access to the WiFi and are sufficiently explained by comments in the program, so I pass it over here.
Before the program enters the main loop, it tries to connect to the broker. The variable client takes over the MQTT object, which of the function connect2broker() is created and returned. If this does not succeed for some reason, a restart takes place after 10 seconds.
try:
client = connect2broker()
except Oserror AS E:
residual()
pressed=False
bland button.IRQ(handler=button pressed, trigger=Pin code.Irq_falling)
DF.volume(vol)
We put the flag pressed On the false and switch the IRQ sharp. We hand over a reference to the ISR, the trigger should be the falling flank of GPIO14. We place the volume on the initially specified 20%, the value in the variables vol.
while True:
    try:
        client.Check_MSG()
        ring=bland button.value()
        IF pressed and ring == 0:
            news=folder[folder]+";"+Str(title)
            client.publish(topicbell, news)
            DF.play(folder,title)
            title=(title+1) % (numoftitles)
            print("Next title",title)
            client.publish(Topicnewtitle, Str(title))
            bland button.IRQ(handler=button pressed, \
                      trigger=Pin code.Irq_falling)
            pressed=False
    except Oserror AS E:
        residual()
    B+=1
    IF B>= 5000:
        flashing(0.05,0.05,green)
        B=0
In the main loop, we first check whether a message from the broker has arrived. The function MessageAeart() then automatically ensures their processing. If someone pressed the bell button, then result ring and pressed together True, the block of the IF structure is going through.
We prepare the Payoad, which we in the following line under the topic in the variables topicbell (House/Doorbell/Ringed) publishers. Then we collect the playing of the title through the variables folder and title is selected. We increase the title number and publishers as a string under the topic in Topicnewtitle. Then we switch the IRQ again and set pressed on False. If an error occurred during the execution of the Try block, this leads to the restart of the system in 10 seconds. The counter B serves to produce the Heartbeat. After 5000 loop runs, the green LED flashes for 50ms and the counter is set to 0 again. The dark time is about 3 seconds. A grinding run therefore takes about 600µs.
Integration into the MQTT system
So far, the MQTT system (Message QUEUING Telemetry Transport) in the storage cellar is recorded and a fan is connected, and the heating temperature is also measured in the heating, as well as switching pump and burner. I have already described the MQTT connection of the door gong itself, now the integration of the broker follows and the treatment by Node-Red. With MQTT, the comfortable operation of the system is easily created by a modular system via a browser. We also log the bell actions with the date and time in a file.
Let's start with the Mosquitto broker. It is configured by three files, two of which we have to add to them.
When introducing user authentication, we had in Episode 5 in the register /etc/mosquitto/conf.d a file with a name-password pairs created (mosquitto_users.txt), secured (mosquitto_users.txt.sic) and then encrypted the passwords in the original file. We are now using this plain text to ensure the new user Doorbell to create. We open with Putty A terminal from the Windows box on the Raspi. Most of the following instructions must be root to be done, hence the introductory sudothat executes the subsequent command under administrator rights.
CD /etc/mosquitto/conf.d
sudo nano mosquitto_users.txt.sic
The nano editor opens with the password file
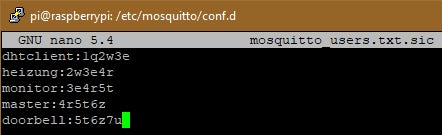
Figure 6: Supplement to the user password file
In the illustration, the user is Doorbell already added. Please note that in the last line no line feed may take place. The file is saved with Ctrl+O, the editor is closed with Ctrl+X.
We now copy the changed backup to the Mosquitto_users.txt work file.
sudo CP -a mosquitto_users.txt.sic mosquitto_users.txt
Then we let the passwords encrypt again.
sudo mosquitto_passwd -U mosquitto_users.txt
The second file to be changed is acl_liste.txt.
sudo nano acl_list.txt
The lines in the red frame must be supplemented so that the user Doorbell can carry out its programmed actions.

Figure 7: The new ACL list
We save again with Ctrl+O and close the editor with Ctrl+X. In order for our changes to apply, we have to restart Mosquitto so that the broker reads the new configuration.
sudo service mosquitto remaining start
Now please copy the content of the file doorbell.py In an empty editor window, save it under boot.py AB and upload this file to the ESP8266. Is the SD card with the sound fragments in the slot of the DF player? Then after a reset the controller should automatically start our program. The blue LED flashes long shorter until the connection to the WLAN router is. After that, the green LED should flash out every 3 second rhythm. At the moment the ESP8266 is still hanging on the USB connection. Messages from the controller should therefore appear in the Terminal of Thonny.
Output:
Player Constructor
Uart (1, baud rate=9600, bits=8, parity=None, Stop=1, rxbuf=15, time-out=0, timeout_char=2)
Client ID EC-FA BC-C5-31-69
#5 ETS_TASK (4020E60, 28, 3ffF92D0, 10)
1.1.1.
Connected: True
Connection status: stat_got_ip
Sta-IP: 10.0.1.94
Sta-netmask: 255.255.255.0
Sta-gateway: 10.0.1.20
AddR ('10.0.1.99', 1883)
Connected to: 10.0.1.99
Subscred to: Haus/Doorbell/Folder Haus/Doorbell/Title Haus/Doorbell/Volume
The marked line contains the client ID, which is transmitted when the connection to the broker is connected. In our case, this is the MAC address of the StA-Interface. Exactly these six hexadecimal values must be entered in the router in the area of WLAN security so that the ESP8266 receives access to the radio network. Please consult your router's manual.
It's time for a first test. We open a second terminal to the Raspi and Subscribe -t "house/#" All topics below a house. Then we press the bell button, not too short.

Figure 8: The first answer from the Türgong
In addition to the sound from the loudspeaker, editions should appear in the terminal similar to Figure 7.
In the second terminal we publish the following messages.

Figure 9: Orders to Doorbell

Figure 10: Answer from the broker
Functions? Excellent, then we climb the third stage, let us place the whole thing in Node-Red in a new tab.
We have to open a browser and the first Node-Red on our Raspi, URL: 10.0.1.99:1880. The JSON file with the Flow from episode 5 Find the link. In Episode 4 and 5 It is shown in detail how a flow is created. You will also learn basic things about dealing with the elements of Node-Red and the window structure.
To import the content of the JSON file in Node-Red, please carry out the following steps.
- Download the JSON file Down, click somewhere in the text and mark and copy the contents of the browser window into the clipboard (Ctrl+A, Ctrl+C).
- Open the menu (three horizontal beams next to deploy)
- Please make a choiche
- Copy the clipboard into the pink window.
- click Current flow and then import.
- Remove all other flows from the work area.
Now complement the nodes shown in Figure 10 from the respective cards. We now go into each type and its configuration individually. However, I strongly recommend that episodes 4 and 5 of this series have not yet gained any experience with Node-Red. Some of the nodes are out of the palette Dashboard. This is not in the standard scope of Node-Red, but must be retrofitted. A step-by-step instructions can be found in the Blog sequence 4.

Figure 11: The Doorbell group
Now open the dashboard view in the right side column.

Figure 12: Open Dashboard view
There we create a new tab,

Figure 13: Create a new tab
which we also edit right away.

Figure 14: Edit new tab

Figure 15: Edit tab node
To update And create a new group in the new tab.

Figure 16: Create a new group
We edit the group afterwards To update.

Figure 17: Edit Group Node
Now the new nodes are pulled out of the palette. We start with the sliders (slider). Double click on the first and here is the configuration for the volume.
Slider using the example of doorbell volume

Figure 18: Slider-Properties
For Folder selection and Set If the configuration is similar, the maximum values are 3 and 7. The group assignment is for all dashboard nodes House doorbell, the label is adapted to the meaning.
MQTT in the example of Newfiction

Figure 19: Edit MQTT in Node
The server is for all MQTT nodes Raspi2b, the topic is entered as it was defined in doorbell.py. The name is selected "speaking" (see Figure 11).
MQTT OUT Using the example of Sendoorbell volume

Figure 20: Edit mqtt out node
Text using the example of actual folder

Figure 21: Edit text node
Label and name are given according to the task.
function

Figure 22: Edit Function Node
Under the rider function the body is entered in a Java script function. The input argument comes from the user Doorbell. It contains folder and title, the played sound. First we create a timeline and secure the previous payload of the message from the MQTT_In-Node in the variable ring. The method tolocalestring() From the time in milliseconds since January 1st, 1970 together has put together a plain text ring. We do not replace the comma in it. We add a line point and the secured Payoad of the entrance message. Together we assign the payload of the message again and give it back. It reaches the output of the function node and is sent to three goals. We already know the type of text ad.
file
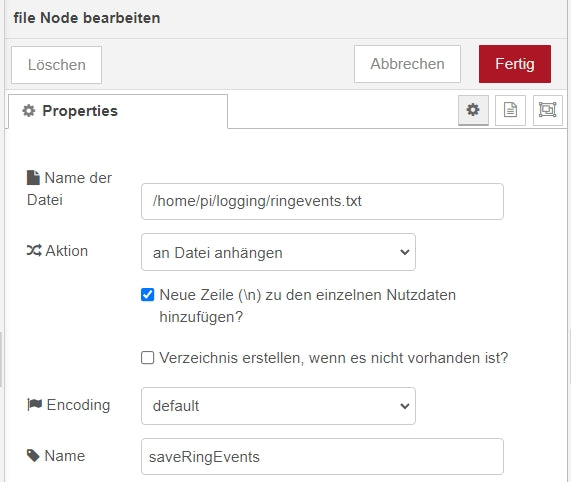
Figure 23: Edit File Node
We award a file name, I recommend an absolute path from the root directory. Because it should be a log file, we choose as an action attach.
debug

Figure 24: Edit debug node
A debug node issues the topic and the Payoad of the message received in the debug window of the right sidebar. This is switched on via the rider with the small bug (bug) or the key code Ctrl+g+d.

Figure 25: Show debug messages
If everything has been set correctly, we can start the first test. The Doorbell unit is running? Mosquitto was restarted? The deploy button was clicked in the Node-Red window? The debug window is activated? Then press the bell button.
This is how the reports in the debug column should look.

Figure 26: Klingel event
If the attempt fails, there is the one here JSON file from my solution proposal for download. However, I recommend so that your work was not for the cat that you first export your design. This can be done again via the menu, selection: export.

Figure 27: Export flow
Then remove your flow (menu-flows-delete) and import the downloaded JSON file. If you now switch to the dashboard window that is URL http://10.0.1.99:1880/ui/, then you should in the tab House find the following presentation.

Figure 28: The current tabelation selection

Figure 29: Doorbell - Dashboard view
Here you can set the volume, specify the theme folder, as well as the title. Because the title number in our program Doorbell.py is automatically increased after every ringing and this value is sent back to node-Red, I have linked the entrance from the title slider with this number backed back. This re -positioned the slider brand after each gong. Of course, you can remove the skills through other controls: a button connection for another door with a different signal, remote release of a signal, mute manual or time -controlled, automatic night shutdown through an LDR, random signal selection, folder forwarding ... You can still see a lot of music in it!
Finally, I still have a candy for you. So that the two core modules can be installed stably in a housing, there is a download to a PDF file with the Layout of a carrier board.

Figure 30: Featured circuit board with power supply 12V to 5V
For the time being, we are at the end of the series Server and clients under MQTT in Micropython on the Raspi and the ESP family arrived. I hope that I could give a small impression of the performance of the MQTT transmission protocol and show how to put ESP32 and Co. and the Raspberry Pi into service. Similar to under UDP, you can of course also develop on the Raspi under MQTT without node-red clients for special tasks-of course on the basis of Python, the mother tongue of the PI. We only scratched a bit on the surface in this series, but I I would be happy if you enjoyed it as much as me. By the way, you will find a summary here all blog episodes published so far On the subject of micropython with the ESP8266 and ESP32. There are very simple examples of the very first handling of micropython to demanding projects.


